Restoration
Whether you're experienced or new, it's important to know how to assess and document water damage in the restoration field. In this guide, I'll explain the necessary steps to ensure your water damage assessments are thorough, accurate, and efficient.
1) Choosing the Right Tool for Documentation
To document water damage effectively, you need to choose the right tools. Gone are the days of using pen and paper for drafting floor plans. Today, we recommend using a floor plan app such as magicplan.
This app lets you make floor plans instantly on your phone, so your reports are digital and easy to access. Additionally, magicplan can integrate with estimating tools like Xactimate® and CoreLogic to streamline your workflow.
2) Initial Assessment: Project Details
When starting your water damage assessment, you will first need to create a project in your chosen documentation tool. Make sure to include the following details:
- Your name and company information
- The date of the report
- The property owner’s name and claim number
- Property details such as location and type
Afterwards, create a floor plan of the property. This layout must include all the necessary objects and items that relate to the damage. The purpose of this layout is to show the full extent of the water damage.
3) Tailored Water Damage Form
When you start your project, it is crucial to use a specialized form to accurately assess water damage. You can use tools like magicplan to design custom forms that you can adjust to your specific business operations. To obtain an insightful water damage evaluation, your form should gather essential data points of the property and damaged area, such as:
Property Details:
- Type of property (residential, commercial, industrial, etc.)
- Age of the property
- Square footage of the affected area
- Type of construction (wood, brick, concrete, etc.)
Incident Information:
- Date and time of the incident
- Was the property occupied at the time?
- Were there any injuries or health concerns because of the water damage?
Water Source and Damage Details:
- Probable cause of water damage (e.g., natural disaster, broken pipe, appliance failure, burst pipes, any water leaking)
- Duration water was present before discovery
- Depth of standing water (if any)
- Was the power shut off? If so, when?
Types of Water Damage (Categories of Water):
- Category 1: White Water - Clean, sanitary water, safe for consumption (e.g., broken water line)
- Category 2: Gray Water - Slightly contaminated water (e.g., washing machine overflow)
- Category 3: Black Water - Highly contaminated water, harmful if consumed or touched (e.g., sewage backup)
Extent of Damage:
- Areas affected (basement, living room, kitchen, etc.)
- Types of building materials damaged (drywall, carpet, hardwood, electronics)
- Visible mold or a musty odor present?
- Any previous water damage incidents in the property?
Immediate Actions Taken:
- Steps taken to mitigate the damage
- Any emergency services contacted (fire department, police, emergency medical services, health risks)?
- Is relocation of inhabitants necessary?
Using a detailed form helps you gather all the needed info. This info can be used to assess the damage, plan the restoration process, and estimate the repair expenses accurately.
4) Visual Evidence: Photos & Annotations
Capturing visual evidence is a critical step in documenting water damage. Capture pictures of key project elements for evidence, to prevent confusion, and for legal protection, such as:
- All structural damage
- Damaged materials and finishes
- Damaged contents
- The cause(s) of the damage
Make sure to add annotations to provide context and additional information for each photo..png?width=1408&height=1080&name=Report%20photos%20iPad%20(Restoration_inspection).png)
5) Detecting the Invisible: Moisture Readings
Water damage isn’t always visible, so it’s important to check for hidden moisture. Use a digital moisture meter to test the ceilings, walls, and floors, and document the moisture levels in your report.
There are two ways to simplify this. First, you can take photos of the moisture measurements from the moisture meter. Second, you can add the readings directly as a custom attribute in your moisture meter or thermo-hygrometer objects.
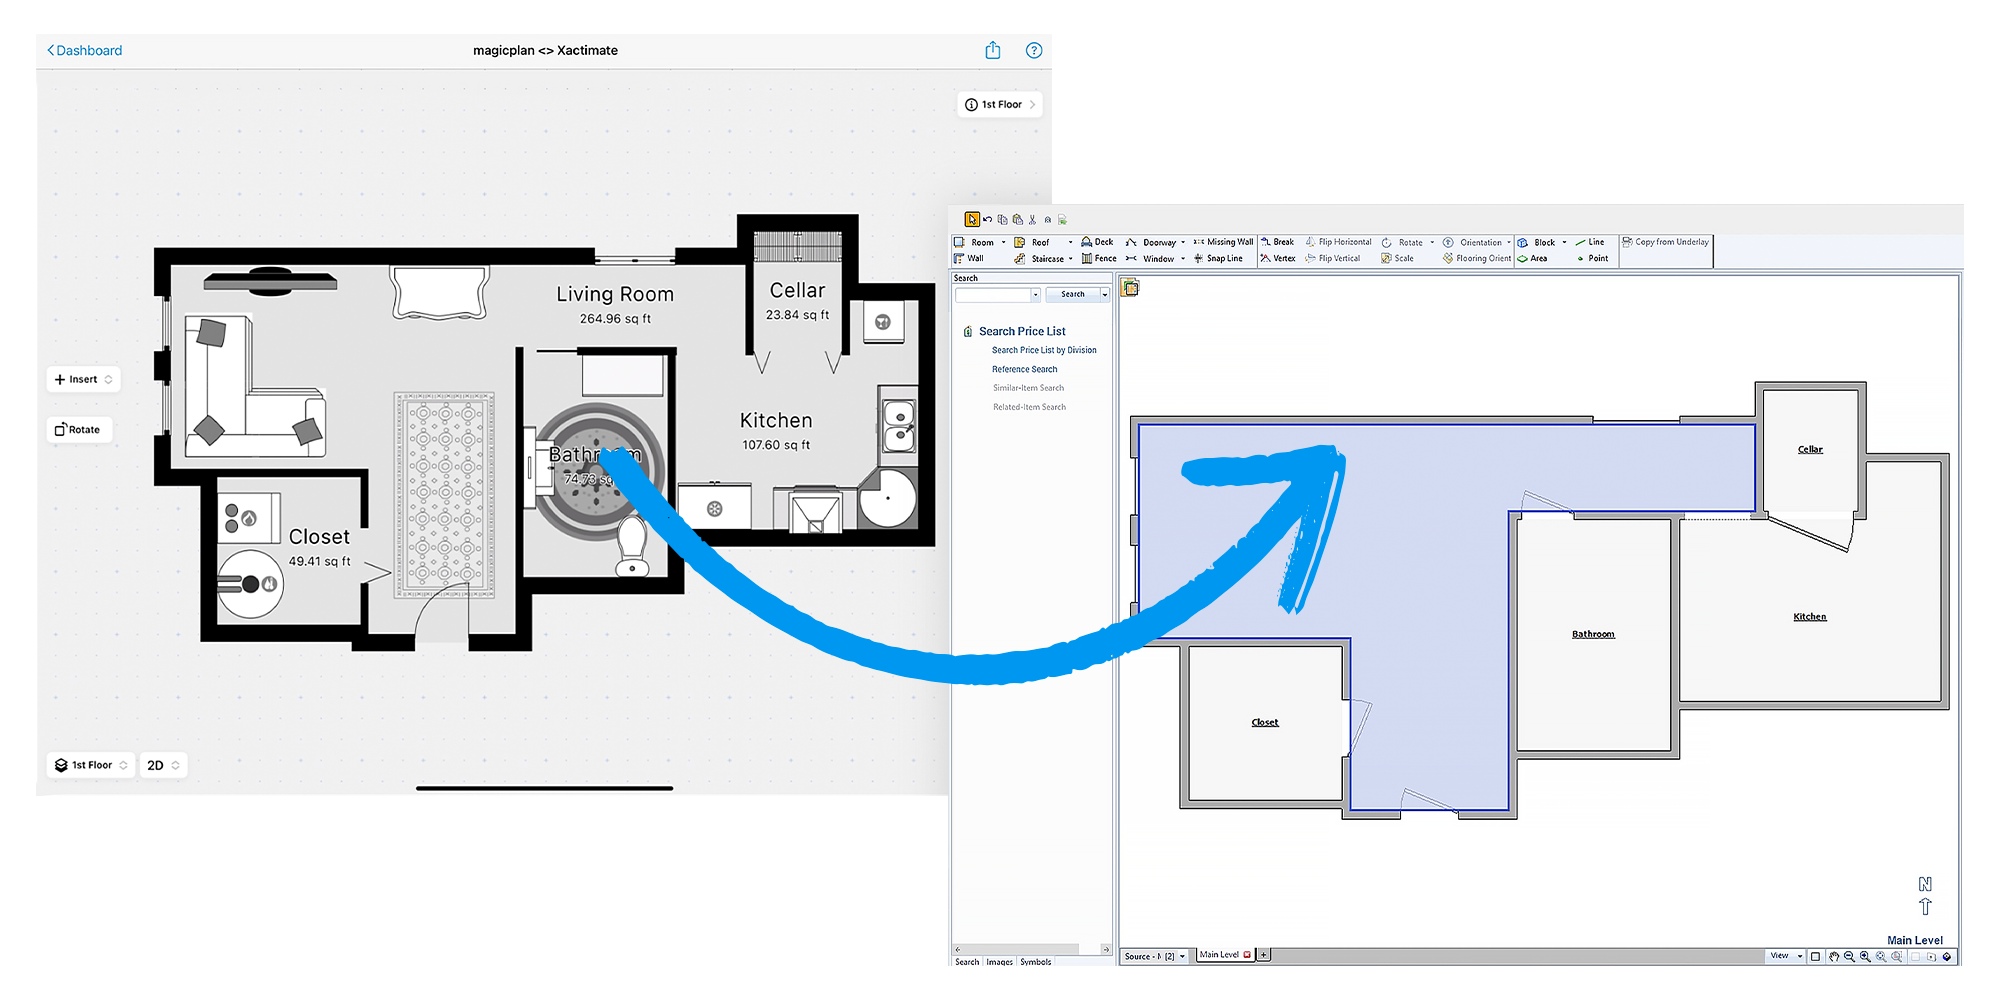
6) Sending Sketches to Xactimate® for Estimating
To ensure you are fully compensated for your services, export your digital sketches and photos directly to estimating tools like Xactimate®. This integration streamlines your workflow and can help accelerate payments of any insurance claim.
7) Real-time Collaboration
Take advantage of magicplan’s collaboration features for remote site monitoring and real-time feedback. This ensures that your team is always on the same page and can reduce the number of trips needed to the job site.
8) Professional Reporting: Exporting and Sharing Your Findings
With all the information gathered and documented, you can now generate a customized report. This report will serve as a comprehensive record of the water damage, your assessment, and the recommended next steps.
Conclusion
Documenting water damage like a pro requires attention to detail, the right tools, and a systematic approach. By following the steps outlined in this guide, you can ensure that your water damage assessments are thorough, accurate, and professional. The aim is to show the damage clearly and completely, so that restoration can be done quickly and correctly.

Benjamin Brown
Sales Consulting Manager
Mastering Water Damage Assessment
The essential e-book for restorers to properly assess water damage jobs.

Share article